
Introduction: The Secret to Smooth, Stress-Free Crocheting
Have you ever finished a crochet project only to realize your hands were sore, your stitches were uneven, or your progress was painfully slow? You’re not alone. Many beginners—and even some experienced crocheters—struggle with one of the most fundamental aspects of the craft: how to hold the crochet hook and yarn properly.
It might sound simple, but the way you grip your tools can make all the difference between a relaxing creative session and a frustrating battle with tangled yarn and aching fingers. In fact, poor hand positioning is one of the top reasons people give up on crochet before they’ve even mastered their first scarf.
But here’s the good news: you don’t need fancy tools or years of practice to crochet like a pro. What you do need is the right technique—one that’s comfortable, efficient, and sustainable over long periods. In this guide, we’ll walk you through the most effective ways to hold your crochet hook and yarn, based on real-world experience, ergonomic principles, and tips from expert crocheters.
We’ll cover the two most popular hook-holding styles, the best ways to manage yarn tension, common mistakes to avoid, and how to adapt these techniques to your unique hand shape and comfort level. Whether you’re just starting out or looking to refine your skills, this article will help you build a strong foundation for smoother, faster, and more enjoyable crochet sessions.
Let’s dive in and discover how a simple change in grip can transform your entire crafting experience.

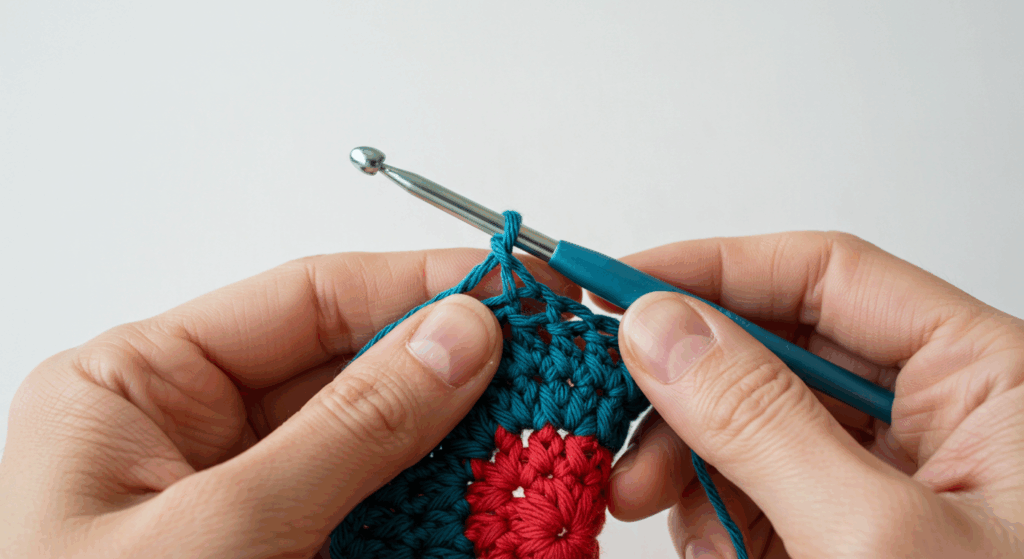
1. The Two Main Ways to Hold Your Crochet Hook: Pencil Grip vs. Knife Grip
When it comes to holding a crochet hook, there are two dominant styles: the pencil grip and the knife grip (also called the “overhand” or “palm” grip). Neither is “correct” in an absolute sense—both are widely used and effective. The key is finding the one that feels natural and comfortable for you.
The Pencil Grip
Imagine holding a pencil to write. That’s exactly how this grip works. You hold the crochet hook near the end of the handle, using your thumb, index, and middle fingers to control it, just like you would a pen. This grip offers precision and control, making it ideal for detailed work like amigurumi, lace patterns, or intricate color changes.
Crocheters who prefer fine motor control often gravitate toward the pencil grip. It’s especially popular among those with smaller hands or who enjoy working with finer hooks and yarns. The downside? It can cause hand fatigue if you’re not careful, especially during long sessions.
The Knife Grip
Now, picture holding a butter knife to spread jam. That’s the knife grip. You rest the hook in your palm and let it rest between your thumb and index finger, with your other fingers supporting it from below. This style uses more of your forearm and larger muscle groups, which can reduce strain over time.
The knife grip is often favored by crocheters who work on large projects like blankets or who crochet for extended periods. It promotes fluid, rhythmic motion, almost like carving through the yarn. Many find it faster once mastered, and it’s easier on the wrists and fingers.
So, which should you choose? Try both. Spend 10–15 minutes using each style on a simple swatch. Pay attention to comfort, speed, and stitch consistency. You might even find a hybrid style that blends elements of both. The goal isn’t perfection—it’s sustainability. Your hands should feel relaxed, not strained.
2. Mastering Yarn Tension: The Hidden Key to Even Stitches
Now that you’ve got a grip on the hook, let’s talk about the other half of the equation: yarn tension. No matter how perfectly you hold your hook, inconsistent tension will lead to loose, sloppy stitches or tight, puckered fabric. The secret? Learning how to guide the yarn smoothly across your fingers.
Most crocheters use their non-dominant hand (left hand if you’re right-handed) to control yarn tension. The yarn typically wraps around one or more fingers to create just the right amount of resistance. Too tight, and your hook struggles to pull through. Too loose, and your stitches collapse.
A common method is the “middle finger wrap” technique:
- Bring the yarn from your ball across your palm.
- Wrap it once around your ring finger for stability.
- Pass it over your middle finger—this is where tension is controlled.
- Let it rest between your index and thumb before feeding it to the hook.
By gently adjusting the pressure on your middle finger, you can fine-tune how much yarn flows through. Think of it like controlling water through a hose—just a slight squeeze changes the flow.
Another popular method is the “index finger tension” style, where the yarn runs over the index finger instead. This gives more direct control and is often used by crocheters who work quickly or with slippery yarns like silk or rayon.
Here’s a pro tip: practice with a contrasting color. Use a bright yarn so you can clearly see your stitches. Crochet a few rows, then examine them. Are they uniform? Are some stitches tighter than others? Adjust your finger pressure and try again.
Remember, tension isn’t about strength—it’s about consistency. With practice, your hand will naturally find the sweet spot, and your stitches will look polished and professional.
3. Common Mistakes and How to Fix Them
Even experienced crocheters fall into bad habits. Here are some of the most common mistakes related to hook and yarn handling—and how to correct them before they derail your progress.
Mistake #1: Gripping the Hook Too Tightly
Clutching the hook like you’re afraid it’ll fly away is a classic beginner error. This leads to hand cramps, uneven stitches, and slower work.
✅ Fix: Relax your grip. Your fingers should guide the hook, not strangle it. Try this exercise: hold the hook normally, then slowly release tension until it feels almost loose. Now crochet a few stitches. You’ll likely find you have more control than you think.
Mistake #2: Wrapping Yarn Too Many Times
Some beginners wrap the yarn around multiple fingers “for better control.” But too many wraps create excessive tension and make it hard to feed yarn smoothly.
✅ Fix: Stick to one or two fingers for tension. More isn’t better—consistency is.
Mistake #3: Inconsistent Yarn Feed
If your stitches alternate between tight and loose, your yarn feed is probably uneven. This often happens when you’re distracted or tensing up.
✅ Fix: Focus on the rhythm. Crochet to music or a podcast to keep your pace steady. Count your stitches aloud if needed. Over time, muscle memory will take over.
Mistake #4: Ignoring Ergonomics
Hunching over your work, sitting in an awkward position, or using a hook that’s too heavy can cause long-term strain.
✅ Fix: Sit in a supportive chair with your project at chest level. Use ergonomic hooks with cushioned handles if you have arthritis or hand pain. Take breaks every 20–30 minutes.
Mistake #5: Comparing Yourself to Others
Seeing someone crochet lightning-fast can make you feel slow or “wrong.” But everyone has their own rhythm.
✅ Fix: Focus on your progress. Speed comes with comfort, not force.
By identifying and correcting these habits early, you’ll not only crochet more efficiently—you’ll enjoy it more, too.
4. Finding Your Personal Style: Comfort Over Convention
Here’s a truth many tutorials won’t tell you: there’s no single “right” way to crochet. While the pencil and knife grips are the most taught, countless crocheters have developed their own unique styles—often blending techniques or adapting them to their physical needs.
Take Sarah, a left-handed crocheter with arthritis. She found the traditional pencil grip painful, so she modified it by using a thicker-handled hook and resting her wrist on a rolled towel. Her stitches are flawless, and she can crochet for hours without discomfort.
Or consider James, a former guitarist who uses his finger dexterity to control yarn tension like he would a string. He wraps the yarn around his pinky for stability and uses rapid, precise hook movements—almost like picking notes.
The point? Your body, your rules. Crochet should adapt to you, not the other way around.
If you have limited hand strength, try ergonomic hooks with soft grips or even inline hooks that require less twisting. If you’re tall or have long arms, you might prefer working with the project farther away from your body. Shorter crocheters may find it easier to keep the work close to their chest.
Don’t be afraid to experiment. Try holding the hook higher up the shaft. Adjust how the yarn exits your fingers. Sit, stand, or even lie down while crocheting (yes, some people do!). The only requirement is that your technique allows you to produce even stitches without pain.
And remember: comfort leads to consistency. When you’re not fighting your tools, you’ll naturally crochet more often, improve faster, and stay inspired longer.
5. Tools and Accessories That Make a Difference
While technique is king, the right tools can elevate your experience from “meh” to “amazing.” Here’s a look at some accessories that can help you hold your hook and yarn more effectively.
Ergonomic Crochet Hooks
Brands like Clover Amour, Susan Bates Silvalume, and Boye Comfort Grip offer hooks with cushioned handles that reduce pressure on your fingers. These are especially helpful if you have arthritis, carpal tunnel, or just want to crochet longer without fatigue.
Hook Size and Material
Heavier hooks (like aluminum or wood) can help with momentum, especially in the knife grip. Lighter ones (plastic or bamboo) are better for delicate work. Try different weights and see what feels balanced in your hand.
Yarn Guides and Tensioners
For those struggling with tension, small tools like yarn rings or tension discs can help regulate flow. These slip onto your fingers and provide consistent resistance, making it easier to maintain even stitches.
Lap Desks or Crochet Pillows
These elevate your project to a comfortable height, reducing neck and shoulder strain. They also keep your yarn from rolling on the floor.
Stitch Markers and Row Counters
While not directly related to grip, these tools reduce mental load, letting you focus on your technique instead of counting.
Investing in even one of these accessories can make a surprising difference. You don’t need everything—just what supports your unique needs.
6. Building Muscle Memory: Practice Tips for Lasting Results
You wouldn’t expect to play piano flawlessly after one lesson. The same goes for crochet. Holding your hook and yarn correctly becomes second nature only through consistent, mindful practice.
Start with short daily sessions—just 10–15 minutes. Focus on one aspect at a time: first, your hook grip. Then, your yarn tension. Then, the coordination between both hands.
Use simple projects to build confidence. A basic scarf in single crochet is perfect. The repetitive motion helps your hands learn the rhythm without overwhelming your brain.
Try crocheting in different environments. On the couch. At the kitchen table. In a coffee shop. This helps your body adapt to various postures and distractions, making your technique more resilient.
Keep a practice journal. Note how your hands feel after each session. Did you experience pain? Were your stitches more even? Small observations lead to big improvements.
And don’t forget to record yourself. A quick 30-second video of your hands in action can reveal habits you didn’t even know you had. Watch it back and ask: Are my movements smooth? Is my grip relaxed?
Over time, your hands will “remember” the right movements, and you’ll barely have to think about them. That’s when the real magic happens—when crochet becomes not just a craft, but a joyful, meditative practice.
7. The Mind-Body Connection: How Technique Affects Your Experience
Crochet isn’t just about making things—it’s about how it makes you feel. And your grip plays a bigger role in that than you might think.
When your hands are tense, your mind follows. You become frustrated, impatient, or even discouraged. But when your grip is relaxed and your movements flow, something shifts. Crochet becomes therapeutic. It calms your nervous system, focuses your mind, and connects you to the present moment.
This is why proper technique matters beyond just neat stitches. It transforms crochet from a chore into a form of creative mindfulness.
Think of it like yoga for your hands. Just as a yogi focuses on breath and alignment, a crocheter focuses on grip, tension, and rhythm. When everything aligns, the work feels effortless—even joyful.
And here’s a beautiful side effect: when you crochet with ease, your projects reflect it. Your stitches are more consistent. Your patterns turn out better. And you’re more likely to finish what you start.
So, the next time you pick up your hook, take a breath. Check in with your hands. Are they relaxed? Is your yarn flowing smoothly? If not, adjust. Because every stitch you make is a reflection of how you’re feeling in that moment.
Crochet isn’t just about the finished product. It’s about the journey—one loop, one row, one mindful moment at a time.
8. From Beginner to Pro: Real Stories of Transformation
Still not convinced that grip makes a difference? Let’s look at a few real-life examples.
Maria, 58 – From Frustration to Freedom
Maria started crocheting during retirement but gave up after two months. “My hands hurt, and my blankets looked like they were made by a toddler,” she said. After learning the knife grip and using a cushioned hook, she was able to crochet for 45 minutes without pain. Today, she teaches at her local senior center.
Devon, 29 – Speed and Precision
A graphic designer by day, Devon wanted to make intricate amigurumi toys for his niece. He struggled with tight stitches until he switched to the pencil grip and practiced tension control. Now, he completes a small plushie in under three hours.
Lena, 42 – Healing Through Craft
After a car accident left her with wrist pain, Lena turned to crochet as therapy. Her occupational therapist recommended ergonomic tools and the middle-finger tension method. “It’s not just about making things,” she says. “It’s about reclaiming my hands.”
These stories show that small changes in technique can lead to big transformations—not just in your craft, but in your confidence, health, and happiness.
Conclusion: Your Hands, Your Journey
Learning how to hold your crochet hook and yarn like a pro isn’t about following rigid rules. It’s about finding what works for you—your hands, your body, your lifestyle. Whether you choose the pencil grip, the knife grip, or a style all your own, the goal is the same: to crochet with comfort, confidence, and joy.
We’ve covered the essentials: the two main hook grips, how to manage yarn tension, common mistakes, personal adaptations, helpful tools, and the deeper connection between technique and well-being. Now, it’s your turn to put them into practice.
Start small. Be patient. Celebrate progress, not perfection. And remember: every expert was once a beginner who kept going.
So pick up your hook. Take a deep breath. And make your next stitch with intention.
What’s one thing you’ll change in your grip or tension today? Share your thoughts in the comments—we’d love to hear your story and cheer you on. And if you found this guide helpful, pass it along to someone who’s just starting their crochet journey. Together, we can make crafting not just easier—but more meaningful.
Happy crocheting! 🪝🧶

Daniele Ferreira is passionate about the world of crochet, dedicating her time to exploring techniques, creating unique pieces, and sharing her knowledge with beginners and aficionados alike. With attention to detail and creativity, she transforms yarn into true works of art, inspiring others to discover the beauty and joy of this manual art.


